Best Squat Racks for Small Home Gyms & Apartments (2026)

Quick Answer — Squat Rack for Home Gym
What is a squat rack for a home gym?
A squat rack for home gym use is a freestanding or wall-mounted steel frame that holds a loaded barbell at adjustable heights, allowing you to squat, bench press, overhead press, and perform rack pulls safely — without a spotter. It is the most versatile piece of home gym equipment you can own, replacing multiple machines in a single compact footprint.
Best overall: Rogue HR-2 Half Rack (~$765) · Best for apartments: PRx Profile Rack (~$795, folds to 6 in) · Best budget: Titan X-3 Flat Foot (~$399)
Minimum space needed: 6×6 ft floor zone · 7 ft 6 in ceiling · 7 ft 2 in width for a standard Olympic barbell. Wall-mount models fold flat and reclaim the full room between sessions.
In This Guide
- What Is a Squat Rack? — definition + featured snippet answer
- Benefits & Honest Limitations — space savings, cost payback, what it replaces
- Full Pros & Cons Breakdown — including who it's NOT for
- How to Set Up Safely — 5-step install guide with pro tips
- Top 5 Squat Racks Compared — side-by-side specs
- Best Squat Racks for Home Gyms (2026) — full reviews with links
- Complete Buyer Checklist — 12 things to verify before ordering
- FAQ — ceiling height, apartments, budget, anchoring, half vs. full rack
What Is a Squat Rack — and Why Does It Belong in Your Home Gym?
Quick Answer: A squat rack for home gym use is a freestanding or wall-mounted steel frame that holds a loaded barbell at adjustable heights, allowing you to squat, bench press, overhead press, and perform rack pulls safely — without a spotter. It is the most versatile piece of home gym equipment you can own, replacing multiple machines in a single compact footprint.
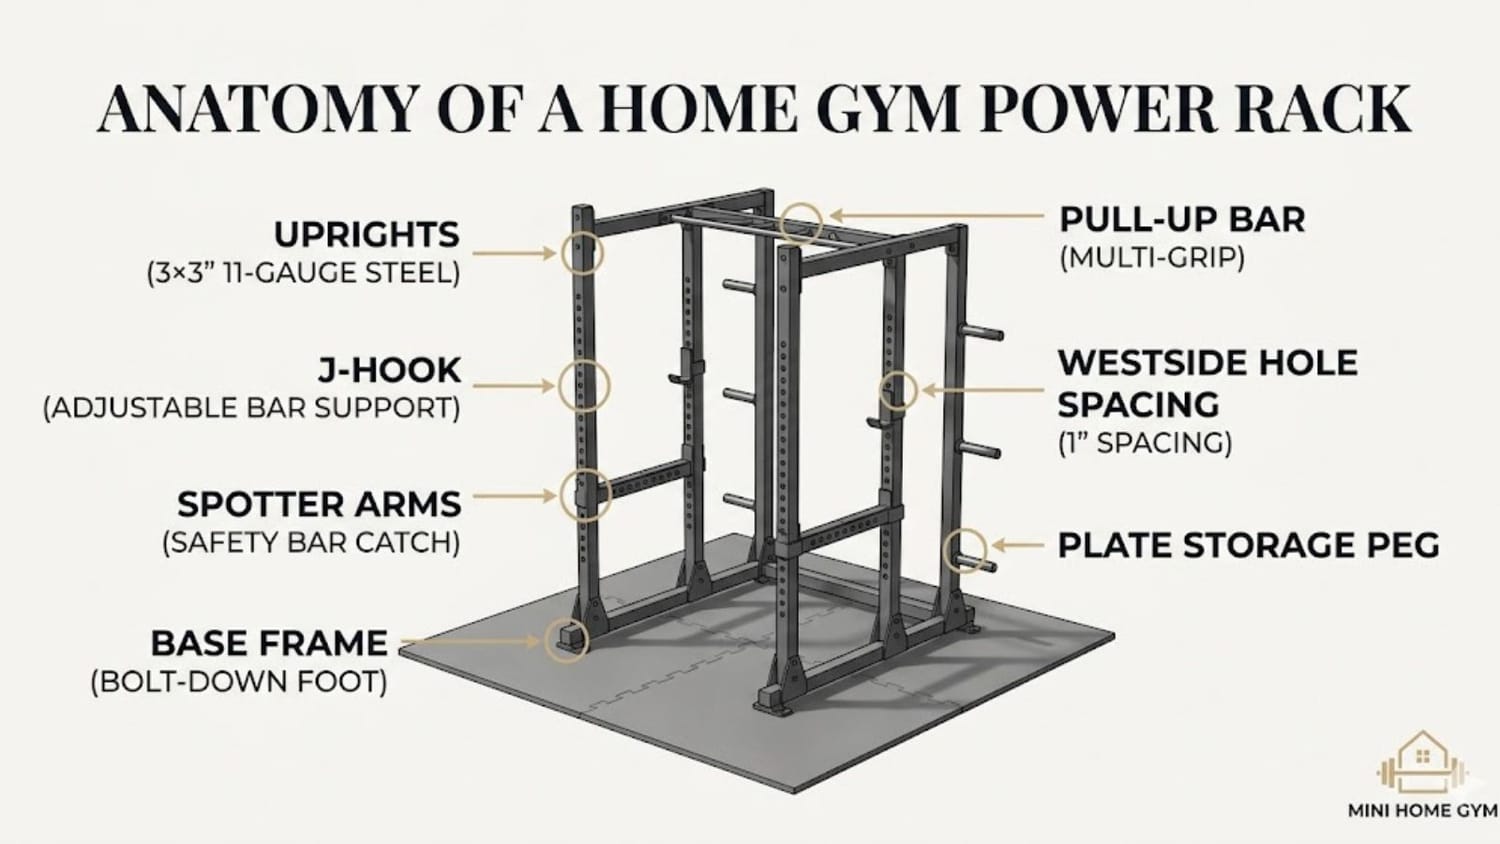
If you have ever searched "squat rack for home gym" and felt immediately overwhelmed by the sheer number of options — half racks, full cages, folding wall mounts, squat stands — you are in the right place. This guide cuts through the noise.
Home gym equipment became a mainstream investment after 2020 — the global home fitness equipment market reached $11.5 billion in 2023 and is projected to grow at 3.8% annually through 2030. Squat racks are the anchor purchase of that market: the equipment most buyers describe as the one they wish they had bought first.
A quality squat rack transforms a corner of your apartment or spare room into a serious training environment. It is not just for squats. With the right rack, you unlock the four most effective barbell movements — squat, bench press, overhead press, and deadlift — all from one piece of equipment that takes up less space than a standard sofa.
The keyword here is smart buying. Squat racks range from $299 to over $1,500, and the difference between a safe rack and a dangerous one is not always price — it is knowing what to look for. By the end of this page, you will have exactly that.
Benefits of a Squat Rack for Home Training
Space-Saving Advantage
Modern squat racks — especially folding wall-mount models — have a genuine space-saving advantage over any other strength training setup. A wall-mount rack folds to within 6 inches of the wall between sessions, reclaiming your entire training zone for daily life.
Beyond space, the core benefit is training freedom. You can push to true failure, train at 11 pm, and skip the gym commute forever. The average US gym membership costs $58 per month — $696 per year. A $600 rack pays for itself in under 11 months, then runs free for a decade.
What a Squat Rack Actually Replaces
One rack covers: barbell squats, bench press, overhead press, rack pulls, barbell rows, pull-ups (with pull-up bar), and band work. That is the output of 4–6 commercial gym machines — in a 4×4 ft footprint.
Honest Limitations to Know First
A squat rack is not the right choice if: your ceiling is under 7 ft 6 in, you cannot anchor to studs (for wall-mount models), your budget is below $300, or apartment noise from dropped weights is a hard constraint. If any of these apply, this guide will point you to better alternatives.
Pros & Cons: The Complete Picture
✓ Pros
- Trains 5+ compound movements — Squat, bench, OHP, pull-up, row. No single machine matches this.
- Safe solo training with spotter arms — Train to failure alone. Spotter arms catch the bar if you miss a rep.
- Space-saving folding models available — Wall-mount racks fold flat, making apartment home gyms viable.
- 10–20 year lifespan — Quality 11-gauge steel racks outlast any gym membership and retain strong resale value.
- Supports unlimited progression — Adjustable J-hooks grow with your strength. You will not outgrow a good rack in a decade.
✗ Cons
- Ceiling height is a hard limit — Standard racks need 8–9 ft. Low-ceiling models (82 in) fit under 8 ft — verify before buying.
- Requires additional equipment — Budget the full system: rack + barbell ($150–300) + plates ($200–400) + mats ($80–120).
- Wall-mounts need stud anchoring — Renters need approval before drilling.
- Noise transfers to floors below — Rubber mats reduce but don't eliminate this for apartment dwellers.
- Assembly: plan 2–4 hours — Most racks arrive flat-packed with 40–80 hardware pieces.
Squat Rack vs. Smith Machine
A squat rack moves the bar freely — stabiliser muscles work every rep. A Smith machine locks the bar to a fixed vertical track, reducing stabiliser activation and altering squat mechanics. For home gym buyers: the rack is the better long-term strength investment. A Smith machine is a reasonable alternative only if you train exclusively for hypertrophy and never intend to compete or develop barbell skill.
✕ Who a Squat Rack Is NOT For
- Anyone with a ceiling under 7 ft 6 in — standard racks physically will not fit.
- Renters who absolutely cannot drill walls and need zero-install equipment.
- Beginners whose only goal is general fitness, not progressive strength — a dumbbell set, bench, and pull-up bar serves the goal at lower cost.
- Strict budgets below $300 — budget racks in this tier use thin steel gauge with real safety risks under heavy load. Wait and save.
- High-floor apartment residents with noise-sensitive neighbours below — resolve the impact noise problem first.
How to Set Up Your Squat Rack Safely
The space-saving advantage of a compact or folding rack is only realised when you verify ceiling height, floor footprint, and stud locations before purchasing. This takes 10 minutes. Not doing it costs $400+ in returns.
Step 1 — Measure Your Space (Ceiling First, Then Floor)
Minimum ceiling: 7 ft 6 in for squat/bench. 8 ft 6 in for overhead press. Minimum floor zone: 6×6 ft including plate-loading clearance. Minimum width: 7 ft 2 in for a standard Olympic barbell.
Measure to the lowest obstruction — beams, pipes, light fixtures — not to the drywall ceiling.
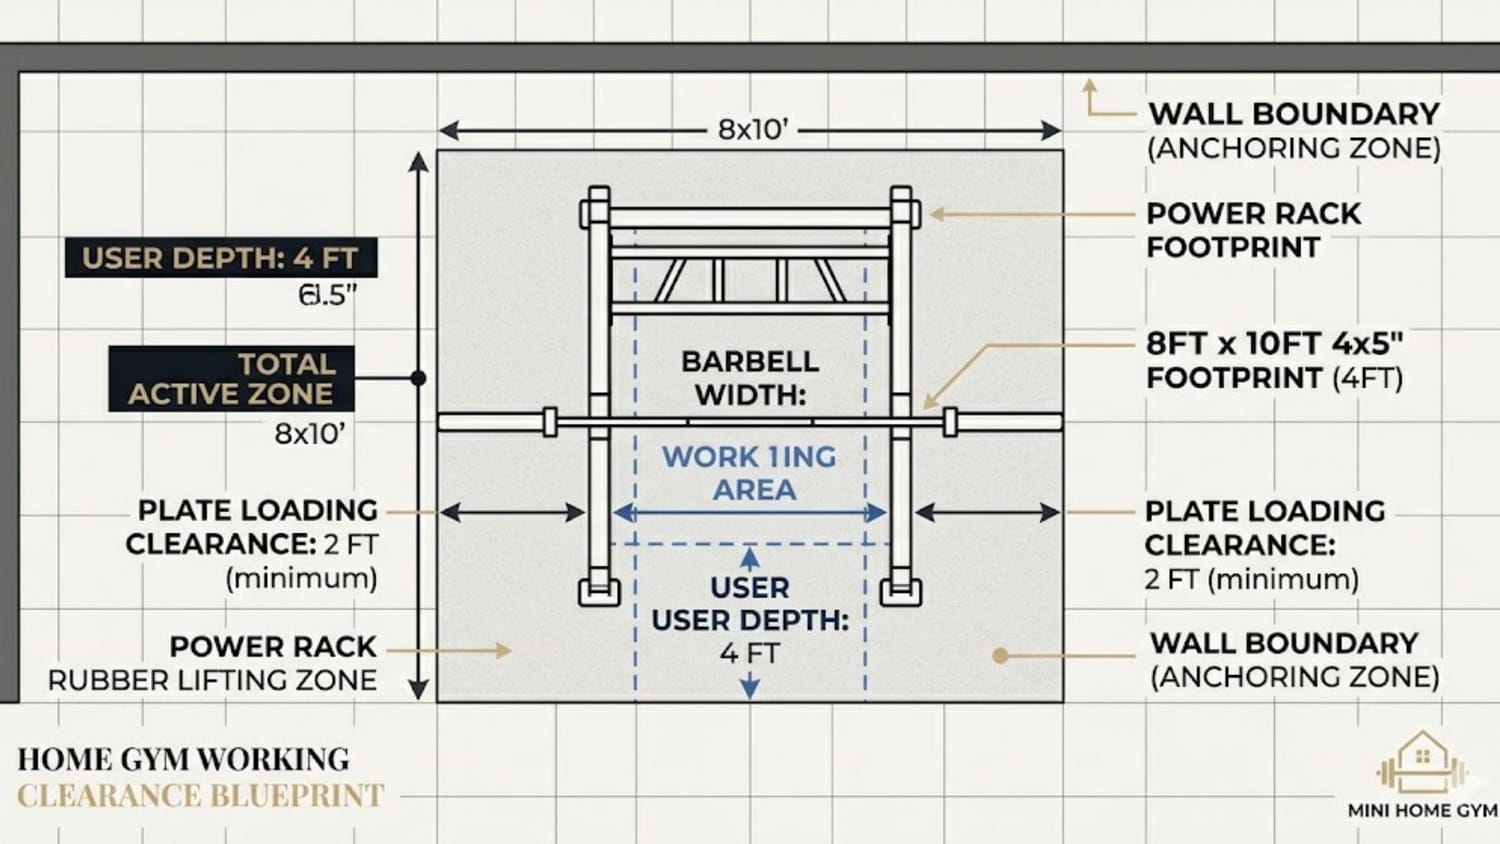
Step 2 — Install Rubber Flooring Before the Rack Goes In
3/4-inch horse stall mats ($45–60 per 4×6 ft sheet) across your training zone. Protects floors, reduces noise transfer, and gives the rack feet traction. Non-negotiable step.
Cut mats with a straight edge and utility knife. One cut per mat. Done in under 10 minutes.
Step 3 — Anchor the Rack — Always
Freestanding racks: bolt feet to floor through the rubber mat using manufacturer hardware. Wall-mount racks: locate studs with an electronic finder — lag bolts must penetrate a minimum of 2.5 in into the stud. Never skip anchoring under heavy loads.
If renting: photograph every drill hole before move-out. Retain all hardware for restoration.
Step 4 — Set J-Hook and Spotter Arm Heights
J-hooks: 1–2 inches below your shoulder height (standing). Spotter arms: 1–2 inches below your lowest squat position. Do a bodyweight squat to depth to confirm before loading.
Mark your settings with tape on the upright — saves 2 minutes of re-adjustment before every session.
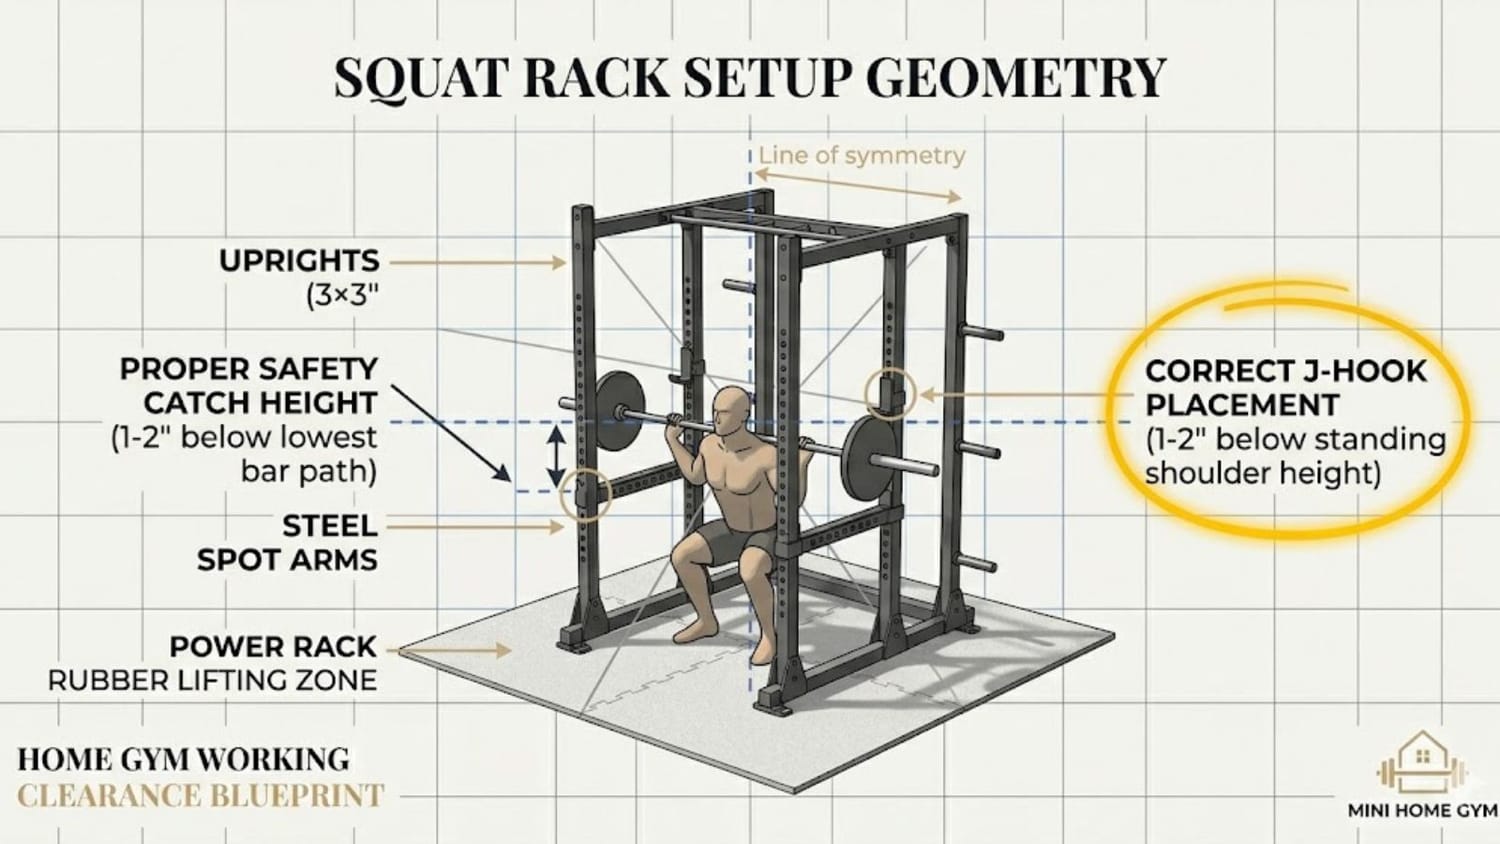
Step 5 — Perform Your Bailout Test — Empty Bar Only
First session, no added weight. Unrack, squat to depth, intentionally roll the bar onto the spotter arms to confirm catch position. This 2-minute test is the most important thing you will do in your home gym.
Top 5 Squat Racks Compared
All five picks were selected for compact footprint, verified build quality, and home gym suitability. Space-saving design was weighted heavily in the ranking order.
Best Squat Racks for Home Gyms (2026)
The Complete Squat Rack Buyer Checklist
Check every box before placing your order.
-
✓
Space · CeilingMeasured ceiling height to lowest obstruction (beam, pipe, fixture) — not to drywall
-
✓
Space · FloorConfirmed at least 6×6 ft training zone including plate-loading clearance on both sides of the bar
-
✓
Space · WidthAt least 7 ft 2 in of width available for a standard Olympic barbell (86 in bar)
-
✓
Wall-Mount OnlyLocated studs with an electronic stud finder — confirmed they align with the rack's mounting points
-
✓
Steel QualityRack steel is minimum 11-gauge (do not accept 14-gauge for any loaded barbell work above 200 lb)
-
✓
CapacityConfirmed dynamic weight capacity — should be at least 2× your current working max
-
✓
SafetyRack includes adjustable spotter arms — not just J-hooks. Spotter arms are non-negotiable for solo training
-
✓
Budget · Full SystemBudgeted for barbell ($150–300), weight plates ($200–400), and rubber mats ($80–120) in addition to the rack
-
✓
FlooringRubber horse stall mats (3/4-in) ordered before rack arrives — install these first, always
-
✓
NoiseConsidered impact noise for neighbours below — rubber mats + bumper plates are the primary mitigation
-
✓
DeliveryConfirmed delivery method — freight shipments require someone present; standard doorstep delivery requires you to move 150–300 lb alone
-
✓
First SessionPlanned a bailout test with empty bar before first loaded session — confirms spotter arm height is correct
Frequently Asked Questions
What ceiling height do I need for a squat rack?
You need a minimum of 7 ft 6 in for squatting and benching only. For overhead pressing, plan for at least 8 ft 6 in of clearance — 9 ft is ideal. Always measure from the floor to your lowest ceiling obstruction (beam, pipe, fixture), not to the drywall ceiling. If you are between 8 and 8.5 ft, the Titan X-3 at 82 inches is specifically designed for this constraint.
Can a squat rack really fit in a small apartment?
Yes — with the right model. Wall-mounted folding squat racks like the PRx Profile fold to within 6 inches of the wall when not in use, reclaiming the full training zone between sessions. A 6×6 ft corner is enough for a complete barbell setup. The room converts back to normal living space in under 30 seconds.
How much should I budget for a home gym squat rack?
For the rack alone: quality entry-level starts at $299–$400 (Titan Fitness). Mid-range with better steel runs $500–$800 (REP Fitness, Rogue). Folding wall-mount models typically cost $700–$900. Budget the full system: add $150–300 for a barbell, $200–400 for a starter plate set, and $80–120 for rubber mats. A complete functional setup runs $800–$1,600 depending on the rack tier you choose.
Do I need to bolt down a squat rack at home?
Yes, always anchor your squat rack. For freestanding racks: use manufacturer-provided anchor bolts to secure the feet to the floor through your rubber mat and into the subfloor or concrete. An unanchored rack can tip under max-effort loads. Wall-mount racks bolt into structural studs — lag bolts must penetrate at least 2.5 inches. Never use any squat rack for heavy barbell work without proper anchoring.
What is the difference between a half rack and a full power rack?
A half rack has two uprights at the front only — reducing the footprint to roughly 4×4 ft. A full power rack has four uprights forming a complete cage, providing rear safety coverage and more attachment points. For solo home gym training, a full cage is safer. A half rack recovers 8–10 sq ft of floor area compared to a full cage. If space is the primary constraint, go half rack. If training safely at max effort alone is the priority, go full cage.
Ready to Build Your Home Gym?
Our top pick for small-space buyers is the PRx Profile Rack — the full cage that disappears between sessions. For the best overall value, the Rogue HR-2 has never let anyone down.
Affiliate disclosure: MiniHomeGym may earn a commission at no extra cost to you. We only recommend equipment we would put in our own gyms.
I test every piece of gear in my actual apartment — noise, footprint, deposit-safety, and real-world durability. No sponsored samples, no showroom conditions. If I wouldn't buy it for my own 650 sq ft studio, I don't recommend it.
Build Your Dream Home Gym—Without Wasting Space or Money
Join the MiniHomeGym Newsletter for expert reviews, space-saving fitness tips, apartment-friendly workout ideas, practical buying guides, and exclusive deals to help you choose the best compact fitness equipment with confidence.